Multi-Factor Authentication With SSH And OpenVPN
Lately I’ve been reviewing the security of my personal online accounts. Aside from regular password rotation, wherever possible I enable multi-factor authentication (MFA). Multi-factor authentication is where you not only supply something you know (your password), but you also supply an additional piece of information based on something that you have.
This step is fairly simple, and because thieves would need to steal both your password and your phone (or similar device) in order to log in to your accounts, the risk of your account being compromised is considerably reduced.
The same principles that we use to protect our bank and email accounts should also be used to protect all administrative access to cloud infrastructures.
In this article I’ll explain how to add MFA protection to your cloud infrastructure.
Best Practices for Remote Access To Cloud Infrastructure
Let’s start by reviewing a typical cloud architecture which supports remote worker access.

Within our VPC (virtual private cloud), we have a private subnet running our database instance, and another private subnet running our application. In order to administer the application and database we need some way to ssh into the EC2 instances. Rather than exposing all of these instances to the public internet, we use a bastion host as the only publicly available ssh service.
The bastion host (aka jump box) is the only instance which is open for remote SSH access. All other VMs in the cloud accept SSH only from that instance. Obviously the bastion host is a very important instance, and must be completely hardened.
Rather than opening up the bastion host to public SSH traffic, we use a VPN service to create a virtual private network. The VPN allows us to create a security group on the bastion host which only accepts SSH from the VPN subnet. The bastion host can then be moved to a private subnet which has no inbound routes from the public internet.
The two hosts that we want to harden with MFA are the bastion host and the OpenVPN host. We’ll see how to do that in the following sections.
MFA Basics
See this article for an excellent overview on MFA: https://www.nist.gov/itl/tig/back-basics-multi-factor-authentication
Traditional authentication mechanisms usually involve the user presenting a username and credentials such as a password to gain access to a resource. This approach relies on the strength and secrecy of the credentials. If either of those are inadequate the resource is easily compromised.
To mitigate this risk, we can use multi-factor authentication to add an additional layer of security. MFA augments the authentication flow by requiring not only something that you know (your password), but something that you have (your phone, a smartcard, etc).

While there are many implementations of smartphone-based MFA, for this article we’ll be using an OATH-TOTP application on our phone to generate one-time use codes. These codes are 6 digit numbers that are changed every 30 seconds. Google Authenticator is one such application.
SSH and MFA
This section is adapted from the following article to support Ubuntu 16.04: https://aws.amazon.com/blogs/startups/securing-ssh-to-amazon-ec2-linux-hosts/
Start by SSHing into your EC2/Azure/Google Cloud VM, then install the MFA packages:
sudo apt-get update
sudo apt-get install libpam-google-authenticator libqrencode3
We now initialize the google-authenticator app:

Using the Google Authenticator app on your smartphone (Android, iOS), scan the barcode presented on the screen to register your device.
Do you want me to update your "/home/darryl/.google_authenticator" file (y/n) y
Do you want to disallow multiple uses of the same authentication
token? This restricts you to one login about every 30s, but it increases
your chances to notice or even prevent man-in-the-middle attacks (y/n) y
By default, tokens are good for 30 seconds and in order to compensate for
possible time-skew between the client and the server, we allow an extra
token before and after the current time. If you experience problems with poor
time synchronization, you can increase the window from its default
size of 1:30min to about 4min. Do you want to do so (y/n) n
If the computer that you are logging into isn't hardened against brute-force
login attempts, you can enable rate-limiting for the authentication module.
By default, this limits attackers to no more than 3 login attempts every 30s.
Do you want to enable rate-limiting (y/n) y
Now that we have our device registered, we need to modify the ssh login flow to prompt for the time-based authentication code.
WARNING: Do NOT close the ssh session where you’re making these changes. Do all your testing in a separate session. This way if you have trouble logging in you won’t lock yourself out of your VM.
Start by editing /etc/pam.d/sshd and comment out the normal Unix auth line:
# Standard Un*x authentication.
#@include common-auth
Also in this file, add the following line to the end of the file to force use of the verification code:
auth required pam_google_authenticator.so nullok
Now edit /etc/ssh/sshd_config and change the ChallengeResponseAuthentication to yes:
# Change to yes to enable challenge-response passwords (beware issues with
# some PAM modules and threads)
ChallengeResponseAuthentication yes
Also in this file, add the following line to the end of the file:
AuthenticationMethods publickey,password publickey,keyboard-interactive
Restart the sshd service:
sudo service sshd restart
Now when you ssh to your VM you should see the following:
~$ ssh -i ~/.ssh/my-vm-key my-user@VM_IP_ADDR
Authenticated with partial success.
Verification code:
After entering the verification code you should be successfully logged in to the VM.
OpenVPN Basics
A VPN, or virtual private network, is a service which allows clients to securely connect to a remote private network. It does this by securely tunneling data through a single TCP/UDP port over an unsecured network such as the internet.
Within a public cloud architecture, a VPN allows you to securely expose your virtual cloud networks (VPCs in AWS and Google Cloud, VNets in Azure) to remote workers or your corporate network. In this article I’ll focus primarily on securely extending connectivity to remote workers.
VPN technology generally falls into one of two flavors… IPSec or SSL. IPSec is commonly implemented with hardware-based VPN services, and each client requires special software which can operate at the kernel layer.
OpenVPN uses the SSL/TLS libraries to manage its cryptographic layer. The dual authenticated SSL/TLS key agreement/exchange method is almost identical to IPsec’s Internet Key Exchange (IKE), and OpenVPN implements a tunnel system like IPsec’s Encapsulating Security Payload (ESP) that has equivalent or better security to the IPSec standard.
Setting up OpenVPN requires a fair amount of configuration, so I’ve created an Ansible role to configure an Ubuntu 16.04 instance with an MFA-enabled OpenVPN service. This is a modification of the popular ‘Stouts.openvpn’ role in Ansible Galaxy to add MFA support.
https://github.com/darrylanderson/ansible-aws/tree/master/playbooks/roles/openvpn
In the following sections I’ll review some of the key prerequisites and network configuration needed to get your VPN up and running, and then walk through how to use the Ansible role.
Create VM And Configure Route
Assuming you already have a subnet created in your VPC to host your VPN VM, launch an Ubuntu 16.04 instance in that subnet.
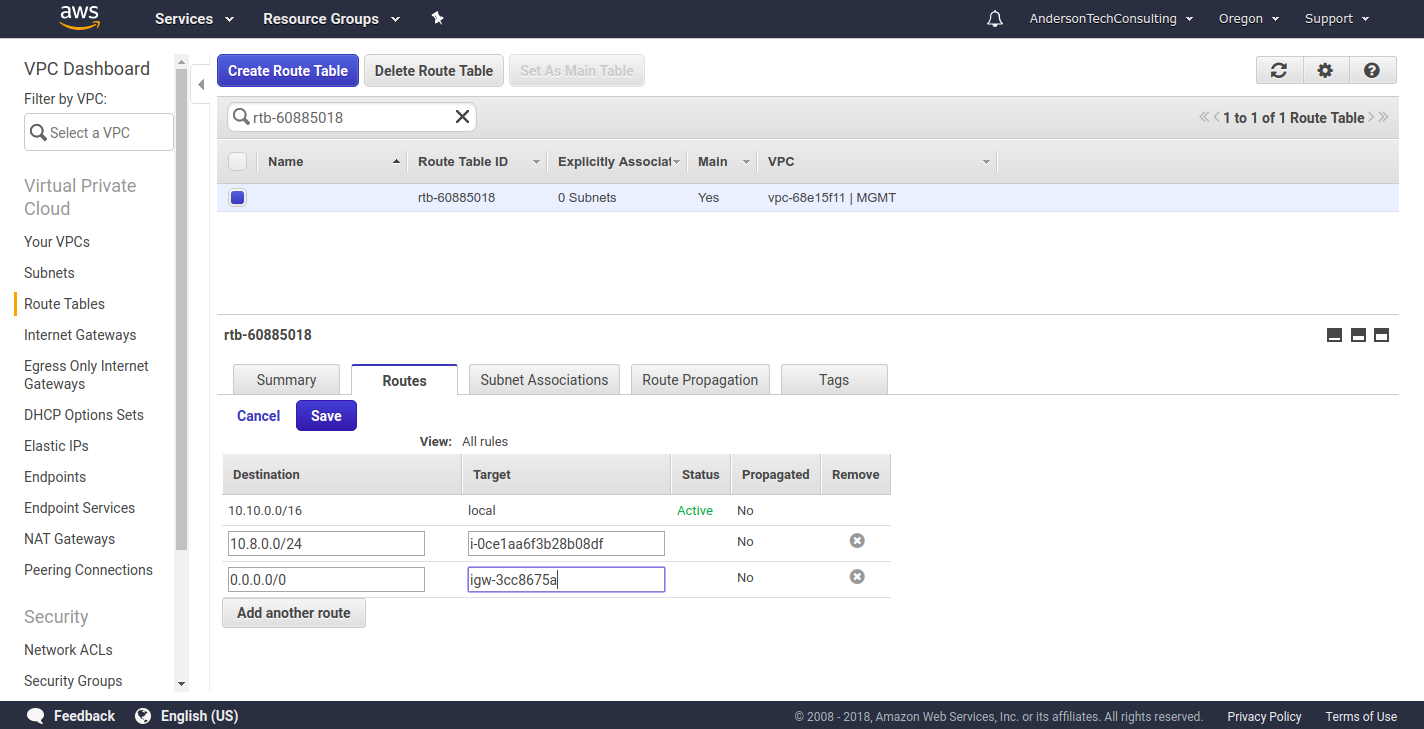
Once the VM has launched, you need to create the network routes. We need the following additional routes on our subnet’s route table:
- A route allowing traffic from the public internet. This will be locked down to TCP/UDP traffic on port 1194.
- A route for VPN traffic to flow to the VPN VM instance.
An example of what this might look like in your AWS environment is shown below:
Configure VM For Packet Forwarding
By default the Linux kernel is not configured to support packet forwarding, which is a requirement for our VPN tunnel to forward packets.
sudo vi /etc/sysctl.conf
Enable ip forwarding by uncommenting the line containing the net.ipv4.ip_forward setting as follows:
# Uncomment the next line to enable packet forwarding for IPv4
net.ipv4.ip_forward=1
You also need to ensure that the network interface attached to your OpenVPN instance allows for IP forwarding, and that it doesn’t do source/destination checks. This allows you to route traffic to your private subnets. The mechanism for configuring this varies depending on your cloud provider.
AWS
In AWS you need to disable the source/destination check on the elastic network interface attached to the OpenVPN EC2 instance to allow packets to route correctly. See Changing the Source or Destination Checking at the AWS doc site for more details.
Azure
In Azure you need to enable IP forwarding on your OpenVPN VM. See Enable or disable IP forwarding at the Microsoft Azure doc site for more details.
Google Cloud
In Google Cloud you need to have launched your OpenVPN VM with IP forwarding enabled. Unfortunately you can’t enable this setting on an existing VM. See Enabling IP forwarding for instances at the Google Cloud doc site for more details.
Configure Ansible
Start by SSHing into your VM, cloning my Ansible repo to get the role and playbook, and install Ansible:
git clone https://github.com/darrylanderson/ansible-aws.git
cd ansible-aws
./bootstrap_ansible.sh
The Ansible role has a large number of configuration options. The simplest approach is to define them in the playbook. Below is an example of a configuration which will create an OpenVPN network using the default CIDR range of 10.8.0.0/24 (the default), and will push a route to clients allowing them to access a private subnet having a CIDR range of 10.10.0.0/16.
playbooks/setup-openvpn.yml
---
# Necessary for Ubuntu 16.04
- hosts: all
  become: yes
  become_user: root
  become_method: sudo
  gather_facts: False
  tasks:
  - name: install python 2
    raw: test -e /usr/bin/python || (apt -y update && apt install -y python-minimal)

# For a local playbook run:  ansible-playbook -i "localhost," -c local --ask-sudo-pass playbooks/setup-openvpn.yml
- hosts: all
  become: yes
  become_user: root
  become_method: sudo
  roles:
  - openvpn
  vars:
    openvpn_use_pam: yes
    openvpn_proto: "tcp"
    openvpn_topology: "subnet"
    openvpn_key_country: US
    openvpn_key_province: IL
    openvpn_key_city: Chicago
    openvpn_key_org: My Company Name
    openvpn_key_email: me@myhost.mydomain
    openvpn_server_options:
      - push "route 10.10.0.0 255.255.0.0"
Run Ansible Playbook
cd ~/ansible-aws
ansible-playbook -i "localhost," -c local playbooks/setup-openvpn.yml
This may appear to hang for a while when generating the server keys if the VM does not have enough randomness (a common issue with Linux VMs). It will eventually finish.
Create OpenVPN Client Configurations
Now that you have your OpenVPN server running, you need to create client configurations.
The Ansible role creates a helper script which does the following:
- Create a new user account.
- Create keys for the user.
- Generate a MFA token for the user.
- Create ovpn file to send to the user.
Here’s how to create a new client:
sudo /etc/openvpn/build-client.sh username
This will prompt you for a password for the user, display the QR code needed to register the smartphone, and if you have mutt installed and configured to send outbound emails, send the ovpn file to the user.


It’s usually easiest to have the user swing by and scan the QR code on their phone, but you can also send them the information offline so they can register their device.
If you don’t have mutt configured, you need to send the user their ovpn file in /etc/openvpn/client-config for them to import into their OpenVPN client.
Now when the client tries to connect, they will be prompted for a password. They should enter their token and password on the same line.
For example, if their password is “mypassword” (hopefully it’s not), and their current MFA token is 345678, they should enter 345678mypassword as their password when prompted by the VPN client.
Revoking Clients
If a user leaves your organization, you can simply run sudo userdel username to deactive their OpenVPN access.
To remove their certificates, run sudo /etc/openvpn/revoke-client.sh username.
Conclusion
Enabling MFA is a key step in hardening the critical remote entry points to your cloud infrastructure. In this article we’ve seen how to MFA-enable both your SSH services as well as OpenVPN. You should also enforce MFA on all your cloud console user accounts.
Of course MFA is only one part of a broader information security management system. Standard security best practices such as network segmentation, intrusion detection, audit trails, patching, etc all have to work together to improve your overall security posture.
Resources
- https://aws.amazon.com/blogs/startups/securing-ssh-to-amazon-ec2-linux-hosts/
- https://www.digitalocean.com/community/tutorials/how-to-set-up-multi-factor-authentication-for-ssh-on-ubuntu-16-04
- https://medium.com/@egonbraun/using-google-authenticator-mfa-with-openvpn-on-ubuntu-16-04-774e4acc2852
- https://aws.amazon.com/blogs/security/category/best-practices/
Also published on DZone.